> ## Documentation Index
> Fetch the complete documentation index at: https://developers.plane.so/llms.txt
> Use this file to discover all available pages before exploring further.
# Docker Compose
This guide shows you the steps to deploy a self-hosted instance of Plane using Docker.
If you want to upgrade from Community to the Commercial edition, see [Upgrade to Commercial Edition](/self-hosting/upgrade-from-community).
## Install Plane
Plane Pro and Plane Business are enabled on this edition, so the Free plan on this edition is easier to trial our paid plans from.
### Prerequisites
* A virtual or on-prem machine with at least 2 vCPUs and 4 GB RAM (8 GB RAM recommended)
* `x64` AKA `AMD 64` or `AArch 64` AKA `ARM 64` CPUs
* Supported operating systems:
* Ubuntu
* Debian
* CentOS
* Amazon Linux 2 or Linux 2023
Ensure you're using the **latest version of Docker Compose**. Check your Docker Compose version with `docker-compose --version` and update if needed.
### Procedure
1. `ssh` into your machine as the root user (or user with sudo access) per the norms of your hosting provider.
2. Run the command below:
```
curl -fsSL https://prime.plane.so/install/ | sh -
```
3. Follow the instructions on the terminal. Hit `Enter` or `Return` to continue.
4. Enter the domain name where you will access the Plane app in the format `domain.tld` or `subdomain.domain.tld`.
5. Choose one of the options below:
* **Express**: Plane installs with the default configurations.
* **Advanced**: You can customize the database, Redis, storage and other settings.
When self-hosting Plane for production use, it is strongly recommended to configure [external database and storage](/self-hosting/govern/database-and-storage). This ensures that your data remains secure and accessible even if the local machine crashes or encounters hardware issues. Relying solely on local storage for these components increases the risk of data loss and service disruption.
6. The installation will take a few minutes to complete and you will see the message **Plane has successfully installed**. You can access the Plane application on the domain you provided during the installation.
7. If you've purchased a paid plan, [activate your license key](/self-hosting/manage/manage-licenses/activate-pro-and-business#activate-your-license) to unlock premium features.
The Commercial edition comes with a free plan and the flexibility to upgrade to a paid plan at any point. If you still want to install the Community edition, follow the steps below:
### Prerequisites
* Docker installed and running. Choose one of the following options:
* **Option 1**\
Create an EC2 machine on AWS. It must of minimum **t3.medium/t3a.medium**. Run the below command to install docker engine.
```bash theme={null}
curl -fsSL https://get.docker.com | sh -
```
* **Option 2**\
Install [Docker Desktop](https://www.docker.com/products/docker-desktop/).
* OS with bash scripting enabled (Ubuntu, Linux AMI, macos). Windows systems need to have [gitbash](https://git-scm.com/download/win).
* User context used must have access to docker services. In most cases, use `sudo su` to switch as root user.
* Use the terminal (or gitbash) window to run all the future steps.
### Installation
1. Create a folder named `plane-selfhost` on your machine for deployment and data storage.
```bash theme={null}
mkdir plane-selfhost
```
2. Navigate to this folder using the cd command.
```bash theme={null}
cd plane-selfhost
```
3. Download the latest stable release.
```bash theme={null}
curl -fsSL -o setup.sh https://github.com/makeplane/plane/releases/latest/download/setup.sh
```
4. Make the file executable.
```bash theme={null}
chmod +x setup.sh
```
5. Run the following command:
```bash theme={null}
./setup.sh
```
This will prompt you with the below options.
```list theme={null}
Select a Action you want to perform:
1) Install (arm64)
2) Start
3) Stop
4) Restart
5) Upgrade
6) View Logs
7) Backup Data
8) Exit
Action [2]: 1
```
6. Enter `1` as input.
This will create a folder `plane-app` or `plane-app-preview` (in case of preview deployment) and will download the `docker-compose.yaml` and `plane.env` files.
7. Enter `8` to exit.
8. Set up the environment variables. You can use any text editor to edit this file. Below are the most importants keys you must refer to:
* `LISTEN_HTTP_PORT`: This is set to `80` by default. Make sure the port you choose to use is not preoccupied. For example, `LISTEN_HTTP_PORT=8080`
* `LISTEN_HTTPS_PORT`: This is set to `443` by default. Make sure the port you choose to use is not preoccupied. For example, `LISTEN_HTTPS_PORT=4430`
* `WEB_URL`: This is set to `http://localhost` by default. Change this to the FQDN you plan to use along with LISTEN\_HTTP\_PORT. For example, `https://plane.example.com:8080` or `http://[IP-ADDRESS]:8080`.
* `CORS_ALLOWED_ORIGINS`: This is set to `http://localhost` by default. Change this to the FQDN you plan to use along with LISTEN\_HTTP\_PORT. For example, `https://plane.example.com:8080` or `http://[IP-ADDRESS]:8080`.
9. Run the following command to continue with the setup.
```bash theme={null}
./setup.sh
```
10. Enter `2` as input to start the services.
You will something like this:\\
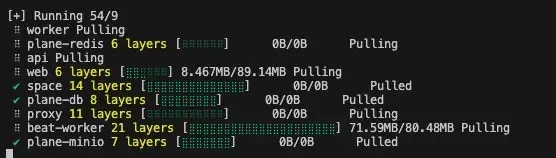 Be patient as it might take some time based on your download speed and system configuration. If all goes well, you must see something like this:
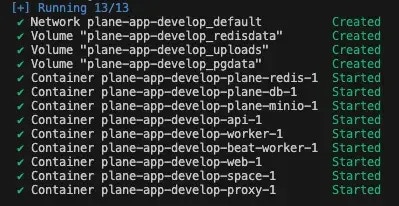 This is the confirmation that all images were downloaded and the services are up and running.
You have successfully self-hosted the Plane instance. Access the application by going to IP or domain you have configured it on. For example, `https://plane.example.com:8080` or `http://[IP-ADDRESS]:8080`.
#### Stop server
In case you want to make changes to the environment variables in the `plane.env` file, we recommend that you stop the services before doing that.
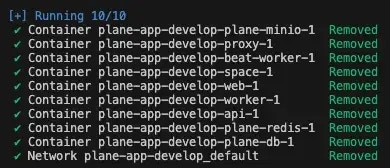
Run the `./setup.sh` command. Enter `3` to stop the services.
If all goes well, you will see something like this:
This is the confirmation that all images were downloaded and the services are up and running.
You have successfully self-hosted the Plane instance. Access the application by going to IP or domain you have configured it on. For example, `https://plane.example.com:8080` or `http://[IP-ADDRESS]:8080`.
#### Stop server
In case you want to make changes to the environment variables in the `plane.env` file, we recommend that you stop the services before doing that.
Run the `./setup.sh` command. Enter `3` to stop the services.
If all goes well, you will see something like this:
 #### Restart server
In case you want to make changes to `plane.env` variables without stopping the server or noticed some abnormalities in services, you can restart the services.
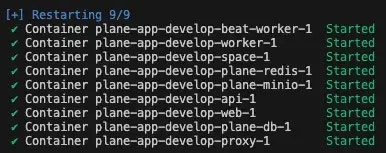
Run the `./setup.sh` command. Enter `4` to restart the services.
If all goes well, you will see something like this:
#### Restart server
In case you want to make changes to `plane.env` variables without stopping the server or noticed some abnormalities in services, you can restart the services.
Run the `./setup.sh` command. Enter `4` to restart the services.
If all goes well, you will see something like this:
 ## Troubleshoot
* [Error during Docker Compose execution](/self-hosting/troubleshoot/installation-errors#error-during-docker-compose-execution)
* [Migrator container exited](/self-hosting/troubleshoot/installation-errors#migrator-container-exited)
## Troubleshoot
* [Error during Docker Compose execution](/self-hosting/troubleshoot/installation-errors#error-during-docker-compose-execution)
* [Migrator container exited](/self-hosting/troubleshoot/installation-errors#migrator-container-exited)